

Color Theory Art Lesson: Citrus Fruit Color Wheel

Area of Study: Color Wheel, Primary and Secondary Colors
Skills Learned: Identifying Tint, Tone, & Shades of Colors
Length of Lesson: 1 1/2 hour to 2 hours, may take two class sessions
EQ: How can aspects of VALUE be applied to COLOR?
Key Objectives:
Create a unique color wheel with images of citrus fruit
Apply color tint, tones, and shades to complete an acrylic painting
Materials Needed:
Acrylic Paint
Paintbrushes (a big size and a skinnier one for details)
Water cups
Paper towels
Easels
Canvas or Canvas Paper
Special Materials Needed:
Color Wheel with Values (for comparison)
Value Example of One Color
Real Lemon or Orange slices (optional)
Prep:
Cut up some scrap paper for practice
If using canvas paper, cut into large squares and tape down canvas with Artist's Tape to hard surface
Overview of Guided Instruction:
Teacher introduces COLOR WHEEL, PRIMARY COLORS, and SECONDARY COLORS and their VALUES or tint, tone, and shade.
Students practice making at least one COLOR with it's TINTS, TONES, and SHADES on scrap piece of paper.
After drawing the basic outlines of citrus fruit with pencil on the canvas, students begin to paint background of image (middle) with practice color mixed for previous step.
*Can be Teacher or Student choice*
Teacher guides students in practice of some citrus shapes (use visuals) on practice paper and when ready again can start mixing the base colors for each citrus shape.
Students paint each citrus with one color and it's values and HUE used as highlights and details.
Creating the Project:
Step 1

After drawing guidelines of each citrus slice, begin by painting background with your practice color.
Step 2

Start painting each citrus slice with the BASE COLOR for each primary and secondary color. Make sure you apply each color around in the right order and using the HUE is the easiest to start with.

Step 3

Now you can start mixing each color and it's tints, tones, and shade and start applying them to each citrus slice. I have included a photo of where each tone and tint, etc go and I also drew this up on the board as you see here too. The visual makes it a lot easier for the students who move quicker or slower than others, like a little cheat sheet! Everyone can move at their own pace.

As you can see, I have also numbered each step so you can follow that order and create this painting with ease. I also included the drawn part of the circles on the board and the important definitions of our values we are learning to mix.

The easiest way is to just move around the circle applying each step one by one until you have a complete color wheel. Color mixing and applying the details is what takes the most time, this may take up to two classes.

You can see how that the HIGHLIGHTS are going in using tints or tones or shades.

*A close up of each side of the painting so far*


Step 4:

Add any last minute details and make sure each VALUE is used.
Assessment:
Each student mixed every color from only the three primary colors.
Each color is made into three distinct values.
Alternatives:
Beginners: Use only BLACK and WHITE as the details.
Advanced: Create a standard color wheel alongside project.
Vocabulary:
Color wheel - a circle with different colored sectors used to show the relationship between colors
Primary colors - three colors: red, yellow, and blue
Secondary colors - made of two primary colors: purple, orange, and green
Tint - hue of color mixed with white
Tone - hue of color mixed with grey (black and white)
Shade - hue of color mixed with black
Hue - another word for color
Value - the lightness or darkness of colors
Please pin, share, and follow!
Thank you and Happy Painting!
Spotlight Book: The Fuzz Budz
Every so often, I will be Spotlighting a Creative Author.
It is not only the visual arts in which we can spread our passions,
but through every outlet of creativity.
And although since this is my primary resource I share,
I will be open to other authors I come across, but let's start here...

I just wanted to share this book with you that is quite a great book for children. As you may or may not know, I once worked for the privately owned studio, OC Art Studios, as an assistant art teacher, then lead art teacher, then as acting studio manager, and personally with the owner, as well. Larissa Marantz, my ex-boss and friend, created these characters called,
The Fuzz Budz.
In actuality, her daughter, Kela Marantz, invented these little guys when she was younger and her parents really thought she had something! So, The Fuzz Budz were born and her mom, Larissa, drew the pictures while her dad, Keith, wrote the story. Cool family, huh?!
In actuality, her daughter, Kela Marantz, invented these little guys when she was younger and her parents really thought she had something! So, The Fuzz Budz were born and her mom, Larissa, drew the pictures while her dad, Keith, wrote the story. Cool family, huh?!

Their first book, Dream-O-licious, introduces each cute character and traits of the Fuzz Budz. For example, there is Apollo the Rabbit who dreams of carrots raining from the sky, Arthur the Owl who is an artist, and Amanda the sheep who dreams of licorice grass, plus a few other ones too! I just love the whole idea and the next book Larissa has also developed an extended version of the characters in their own separate stories. And they are awesome! Can't wait to officially read them to Sage during bedtime. :)
Don't forget to click on the links above to find out more about her other books, too!
Thanks for reading
Don't forget to click on the links above to find out more about her other books, too!
Thanks for reading
Repurpose Old Artwork on Canvas
How many of you have old projects laying around that still remain unfinished?
I know I have ALOT, but I don't want to throw away the perfectly good pieces of canvas.. but we also don't need that kind of clutter around our homes or studios.
What can we do?
All you need is a paint brush and the secret ingredient....
WHITE PAINT!
It is as simple as pie.. repaint your old paintings with a layer of white, or two or three or more, let it dry and then there you have it, a BRAND NEW CANVAS!
White is like the "Painter's Eraser"
It is a perfectly sustainable and easy (and cheaper!) way to get new canvases so we can create even more awesome pieces of art that we ACTUALLY want to work on.
Hope you like my tutorial!
Don't forget to SUBSCRIBE
:)
Don't forget to SUBSCRIBE
Panda Drawing Lesson
Today we tried a drawing lesson from...
The website is clear and good with step by step directions for simplified drawings of animals, faces, flowers, superheroes, fantasy creatures, and other things. I definitely recommend it, although covered with ads, but free information has to come with something, right?
The website is clear and good with step by step directions for simplified drawings of animals, faces, flowers, superheroes, fantasy creatures, and other things. I definitely recommend it, although covered with ads, but free information has to come with something, right?
So here we are.. the lesson we tried was a Panda Drawing Lesson found here:
We extended the lesson by creating more foliage and going off the bamboo drawn in their step by step directions. I love how they turned out with all the details of the bamboo forest and some moons in the sky.


Goodbye School, Hello Summer!
"It's time to say goodbye, but I think goodbyes are sad and I'd much rather say hello. Hello to new adventures."
School is out at ACE Academy where I teach art, and summer has begun..
It was a great year for myself and my art students and I am sad but happy to see them go, so much to explore in this world.. who wants to waste it in a classroom?!
Just kidding, school has positive qualities, too, but so does the outdoor classroom....
Enjoy and Have Fun Little Ones!
I'll be here in the Fall.. ready for ART!
--
Now, check out these hot air balloons, taking off! Going on their first summer adventure...
✌


Happenings in the ACE art room...
Artists of the Month
In the last few months at ACE Academy, we have been studying famous artists... Paul Klee, Vincent Van Gogh, Henri Rousseau, and Gustav Klimt.

I am loving being able to study an Artist and their works with students instead of doing art projects with no direction. It gives the projects more meaning when we have been studying the artist for weeks at a time. And the information given has more of a tendency to stick in the mind.
Ahh the power of multiple styles of learning!
Murals
Each month when we study our Artists and their artwork, we have been completing collaborative projects like.. MURALS!

I love the idea of creating something together. A group project gives two great opportunities: to learn about a specific piece from the Artist and how to work together. Students were able to work on their sections when we had extra time after a lesson. It is the most perfect solution for finding "early finishers" something else to do.
Next up...
Portfolios
I am currently in the process in putting a portfolio unit together so students can learn to create studies and save their work like professional Artists do. I am very excited to get the students more involved in why we create Art. This would come with a possible gallery or art show happening with the school. I want to talk to a few of the staff and teachers and see if the school would be interested in doing that for an interactive learning experience for the kids. Not only students from our class can be involved, we can open it up to anyone, even staff, or a whole class!
Let the creative juices flow in whichever way they choose!

New year, new goals, new attitude
Welcome to the 2016-2017 school year!

The year has officially begun for the new school year!
I am now back in action after a maternity leave. I'm ready to teach art and make amazing lesson plans to share with students and other educators.
And I am excited for this year. I have some good ideas in the works! There will be some challenges along the way with maintaining my level of activity (due to the newest addition to my family) but I am looking forward to fulfilling to some much needed goals and lesson plans. My baby girl is my newest motivation to manage my time and new burst of creativity.
A new year is ahead with a lot of opportunities to do my best .. Let's do this!
.
.
.
'The earth without art is just "eh".'
Ms. Jessica
The Art Teacher
Teacher Appreciation Sale!

I am having a Teacher Appreciation Sale from May 3 to May 4, TWO DAYS ONLY!
20% off EVERYTHING IN MY STORE!
I have a few new handouts up for Set Design and my lesson plan templates as well. I have been working on getting my original art lesson plans up there, too.
I can't wait to share those when they are ready!
Thank you
:)
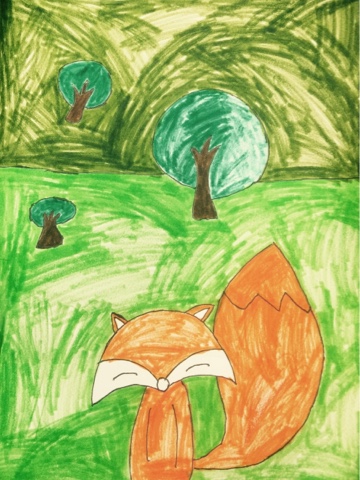
Fox Drawing Lesson
We made a fox!
I found this lesson on Pinterest and it was a fun one that each class enjoyed so much.
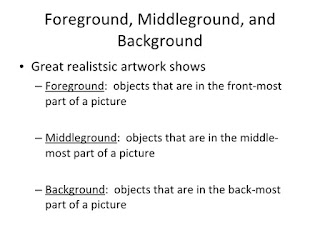
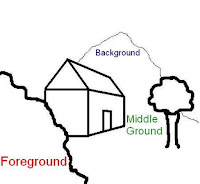
Each student created their fox in the foreground after learning about this element including middle ground and backgrounds in a composition...


Here is the step-by-step:
Every single fox was a happy little dude or gal!
Some examples of student work:


I recommend this lesson when learning about woodland animals!
Enjoy
Creating Mandalas
What is a mandala?
"A mandala is a sacred space, often a circle, which reveals inner truth about you and the world around you."

"In Sanskrit mandala means both circle and center, implying that it represents both the visible world around us (the circle-the whole world) and the invisible one deep inside our minds and bodies (the center healing circle) from Native American and Tibetan sand-paintings to Gotgic rose windows and Hindu yantras, mandalas are used as symbols for meditation, protection, and healing."
- Clare Goodwin 1996
ART PROMPT: CREATE A MANDALA USING PATTERN AND SYMMETRY.
Students were taught how to create mandalas using repeating patterns and symmetry design. Each student created a mandala on 9x9" drawing paper using sharpies and colored pencils.


I will be adding a template I used to create the mandalas (once I find where it went!) to this post, so check back soon or please comment for questions.
-
Have you found other ways to bring mandalas into your child's education?
Let me know your findings so we may all learn together!
Subscribe to:
Posts
(
Atom
)